The best (and cutest) knitting stitch markers

There’s a good chance that, if you’re knitting a bit of clothing, you’ll at some point need to use stitch markers – especially if you’re working in the round.

While you can just as easily use a few strands of brightly coloured yarn, I much prefer ‘proper’ markers; there are so many fun, bright and beautiful stitch markers out there, and they look so cute dotted along your knitting.

I’ve been searching for more to add to my collection, and of course went straight to Etsy. So, here’s a round up of my absolute favourite stitch markers and sellers (and at the end, you’ll see the ones I actually went for!).

Rainbow Cake Stitch Marker (Korutumi) £2 each

stitchmarker1

How bright are these?! I adored the way these cake slice markers fit together to make a full cake. And Korutumi has a bunch of other lovely handmade designs, including these honeybees (save the bees!), which they make to order.

Penguin Stitch Markers (AbsoKnittingLutely) £8.50 for 4

stitchmarker2

I love penguins (who doesn’t?) and these reminded me so much of Feathers McGraw from Wallace and Gromit. The shop has a range of other novelty markers, but if you’re looking for quantity the set of 10 super colourful felted markers (picture below) could be just what you’re after.

stitchmarker3

Cards Against Humanity Markers (CalefRoadCrafts) £9.39 for 6

stitchmarker4

Okay, so these are about as far from cute and cuddly as you can get, but if you’re a fan of the gross-out game Cards Against Humanity these are the markers for you. CalefRoadCrafts also has a bunch of other geeky markers with designs from Adventure Time and Game of Thrones.

Yarn Ball Markers (HandDrawnYarn) £15 for 5

stitchmarker5

Edinburgh seller HandDrawnYarn’s beautifully handcrafted yarn ball markers really are something special. They’re available in a range of colours and would make a brilliant gift for knitting enthusiasts (i.e to me, from me, right?) – don’t forget to take a peep at the shop’s range of quirky yarn ball earrings while you’re there.

Literally everything (Stitchcuddles) roughly £4-£5 for 2, £7 for 4

stitchmarker6

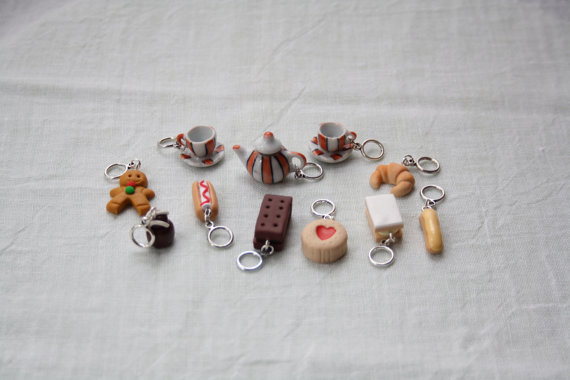
What can I say about Stitchcuddles’ wonderful designs? This shop was definitely my standout favourite of the lot, and it was impossible for me to pick a favourite from shop owner Steph’s collection of good-enough-to-eat handmade markers – though if money was no object I’d have definitely plumped for the Afternoon Tea themed set (pictured above) which gets you 11 markers for £17.50. You can even pick the pattern for your tea set!

stitchmarker7

stitchmarker8

In the end I went for the Tea for Two – pictured above – with bourbon biscuits (my favourite!) instead of croissants and a floral patterned tea set. I couldn’t believe the amount of choice; you can pick from about 25 different tasty treats and every single one seems so carefully made.

I’m totally delighted with my purchase and can’t wait for them to arrive. I’ll be sure to post a picture of them in action!

Do you have a favourite shop for knitting accessories? Or are you a crafter that makes stuff like this? Let us know in the comments below. Hope you’ve had a lovely weekend! 

The beekeeper’s quilt

Close up of a single knitted hexipuff for the beekeeper's quilt.

If you’re a regular on Ravelry you’re sure to have already heard of the beekeeper’s quilt, a mammoth blanket project made up of lots of tiny little stuffed, knitted hexagons – also known as hexipuffs.

If you’ve never heard of it, it’s a really great project that’s perfect for using up spare sock yarn (it’s knitted in 4ply) and for something to work on when you’re on the move or watching telly.

But it’s no small undertaking; for a big blanket you need at least 300 of the squidgy little dudes, and each one can take between half an hour and an hour – depending on how quick you are! From what I’ve seen on Ravelry, most people tend to pick it up between larger projects or make one or two hexipuffs as and when they feel like it, which is exactly what I’ve been doing too.

Collection of hexipuffs knitted with KnitPicks Chroma.

I’ve been working on my blanket on and off, according to my project on Ravelry, since May 2014, and I think I have about 80 hexipuffs so far. I don’t think I made any at all last year, so really that’s not so bad!

I haven’t actually made socks before (they’re on my list) so I’ve been buying yarn especially. I chose to use the beautiful Knitpicks Chroma, which has stunningly subtle colour changes and means I can make hexipuffs in lots of lovely coordinating colours without having to rummage about for different yarn. So far, I think it’s made my hexpuffs look like pastel-coloured sweeties.

Another collection of hexipuffs knitted with KnitPicks Chroma.

What really appealed to me about the project in the first place, weirdly enough, was the amount of time it could take. I loved the idea that I would be spending a chunk of my life, on and off, creating something that could be in my family for years. That’s the thing about blankets – they’re such a big, yet quiet, part of family life, whether wrapped around someone when they’re poorly or slung over the back of the sofa during the spring.

Thinking about giving this project a go? It’s knitted in the round, so make sure you have the right set of DPNs – and if you haven’t knitted in the round before, this is the perfect place to start! Take a look at these great hexipuff pattern ideas or browse the Ravelry project for inspiration.

I’ll be posting further updates as I go along, as I’m determined to get a whole bunch of these done over the coming months. If you’re making a beekeeper’s quilt of your own, I’d love to read about it or see a picture – just post in the comments below!

How to block #2: steam

You might have read about my very first attempt at blocking my knitting, where I bravely plunged my finished pieces into warm water and pinned them out to shape.

It was pretty much an act of blind faith in the internet and, luckily, it paid off – but I did find it to be a pretty brutal process, and my pieces took absolutely ages to dry off.

With that in mind, I decided to try a different technique when my latest project, a corn cob patterned cushion from the book Knitted Cushions by Alison Howard, asked for light blocking. Having had a little Google around, I went for steam blocking.

Steam blocking is scary sounding, but actually really simple.

First, you pin out your knitting to the right shape and size; I found this so much easier than pinning out floopy wet knitting and far less panic inducing. Also, after taking this photo I realised that these pins work much better if you slide them in horizontally rather than just sticking them in vertically like an idiot. The more you know, eh?

Knitting pinned out ready for blocking.

Then, you soak a thin towel in water, wring it out, and lay it over the top of your knitting.

Covering knitting with wet towel in preparation for blocking.

Next is the fun part! Grab your iron, set it to the top setting, and iron over the top. This creates steam that gently pushes through onto your knitting. Keep going until the towel is dry.

Steam blocking knitting using an iron.

Once you’ve done that, leave your knitting to properly dry out (this Craftsy article says about half an hour, but I gave it a couple just to be safe), and you’re finished.

Cushion pieces pinned out for steam blocking.

I was really impressed by the effect of this blocking technique (previously, the front of my cushion wouldn’t hold shape and was about four inches short of the right width) and I found it far less scary than wet blocking.

It’ll definitely be my go-to approach on my next project! 🙂

Crochet for beginners

The other day I found myself cooing over the patterns and kits over at Toft Alpaca Shop for the thousandth time, and this totally mad crochet flamingo finally tipped me over the edge. I had to have it. And I suddenly thought – why not just learn how to crochet? So, I did!

I already had a crochet blanket kit that I picked up at last year’s Handmade Fair, so I had everything I needed to get started when I had an afternoon to myself. Unfortunately, two hours in and four tries later, it seemed the kit wasn’t quite right for beginners – and I was ready to launch my crochet hook out the window.

Luckily, a little Googling the next day turned up this brilliant tutorial for simple granny squares on the blog Little Tin Bird. Heather, the blogger behind the site, explains every single step carefully with some extremely helpful pictures.

I had the right yarn and hook to give it a go, so I sucked it up and gave it another try!

IMG_7949

With this pattern, I practiced chain stitch, treble stitch and slip stitch. After how much I’d struggled with the other pattern, I can’t tell you how happy this tiny, pretty wonky pink square made me feel.

IMG_7950

I also learnt how to change my yarn colour.

IMG_7951

IMG_7952

IMG_7953

And, just like that, I had my very first granny square!

IMG_7955

It’s uneven, lumpy and a little sad looking in places, but I don’t care – I’m so delighted with how it’s turned out, and can’t get over the simplicity and helpfulness of the walkthrough on Little Tin Bird. If you’re thinking of giving crochet a go, it’s a fantastic place to start – I definitely recommend it!

Next, I think I’m going to make a bunch more squares to practice each technique. It’s so fun to be learning something new, and while I’ve a habit of trying to run before I can walk I really want to slow down and get my head around the basics.

If you have any beginners’ crochet patterns you’d recommend, let me know. I’d love to give them a try!

Learning how to block (and why you should too)

Right. It’s no secret that I’m a ridiculously haphazard kind of crafter, so it’ll come as no surprise to anyone that I’ve never bothered to block my knitting before.

If you’re wondering for starters what blocking even is, well, pull up a chair my friend. Essentially it involves dampening a piece of knitting (either by submerging it in water or using steam) and then pinning it out into the shape and size you want your finished piece to be.

I’ve never bothered to do this, more or less because I was worried it would go wrong and no one had really proven to me the benefits. But trust me, it makes a huge difference to the shape, size and finish of your work.

IMG_7869

Blocking is especially useful when you’ve been doing a lot of shaping, cabling or lace work, as these things can totally mess up your tension and in turn make whatever you’re knitting come out a dodgy shape or size – like these sleeves did.

IMG_7863

Dampening your knitting helps to relax the stitches. And that’s no joke; after submerging my pieces and lifting them out, the stitches were so relaxed it looked like my knitting wanted to droop languidly back into my washing up bowl.

By relaxing the stitches you’re then able to pin out your piece into the right shape, referring back to the measurements in your pattern. It’s also great for creating nice neat edges before you sew them together.

So, how did I do it? I’m going to show you my first attempt at blocking, with the example of the sleeves for the jumper I’m working on from Pom Pom Quarterly Spring 2015. Here’s my step by step, using the immersion method

1. First, I measured my knitting and had a look at the pattern to see what dimensions I needed to block to. I found that one sleeve was already the right length, while the other would need to stretch a bit.

IMG_7867

2. Then I filled a clean washing up bowl with lukewarm water; hot water can felt your knitting, which you definitely don’t want. Craftsy suggests adding a little mild shampoo, but I just threw in a couple of pinches of wash powder (not enough to make it soapy) because I was nervous about getting bubbles everywhere. Then, the scary bit – submerging my knitting!IMG_78733. When my knitting was properly soaked – I let it lurk about underwater for a good few minutes – I carefully lifted it out and let the water drain away. I gave mine a scrunch to squeeze out some of the moisture, but be really careful; agitation, like properly hot water, can felt your knitting and make all the stitches smush together.

IMG_7872You can also lay your knitting between two towels, roll it up and squeeze out the water that way. That sounds safer than what I did, reading it now! If you’ve used shampoo or things have got a lil soapy, run the bucket with cold water until the soap drains away, then take out your knitting.

4. Next, I started pinning out my knitting. I recommend these T-pins, which I bought from Amazon for about £4, and this equally cheap kids’ play mat. They’re perfect for the job.

I really enjoyed this part – despite the fact that it’s so precise, which is a little against my nature. I carefully measured as I went along to ensure all the dimensions were exactly right.

IMG_7875
IMG_78775. Once I’d done an edge, I worked all the way around my piece of knitting until it was pinned flat to the exact right dimensions. Then I left it in an airy room to dry out.

IMG_7880

And, well, that was that! I felt like against all my (bad) instincts, it was best to be patient, so I left it a good 24 hours even though it probably wasn’t necessary.

A few days later, I also blocked the front and back of the jumper; you can see how effective blocking is at getting things into the right shape. I’ve never had a piece that looks so neat!

IMG_7904

Overall I loved trying out a new technique. I often find myself being stubborn and stuck in my ways, refusing to try new methods or ways of finishing, so I’m proud of myself for actually giving it a go.

Here are some of the pages I used. They were all really helpful:

Next time you’re about to make up a piece of clothing, think about whether blocking might help and if you decide to take the plunge, let me know how it goes. If, instead, you’re a bit of a blocking pro – feel free to leave any tips and tricks in the comments. I’m still very much a learner!

Anna Hrachovec’s Teeny-Tiny Mochimochi

They don't get much teenier, or much tinier, than this.

They don’t get much teenier, or much tinier, than this.

When I first got into knitting at about ten years’ old, I was only interested in knitting toys. In fact, I only knitted a jumper for the first time about 18 months ago; before that, it was always, always exclusively cute things on my needles.

How then could I resist Anna Hrachovec’s designs? I stumbled across her work on Ravelry a year or so ago and had been desperate to try some patterns ever since. Thinking I’d literally start small, I bought one of her books, Teeny-Tiny Mochimochi. That was last June – and I’ve finally gotten around to trying it!

First off, my initial impressions: the book itself is beautifully photographed and really well-written. Every character has it’s own cheeky little bio line – some of which made me laugh out loud – and the instructions are very clear.

Every question you could possibly have is answered before you even jump into the patterns themselves, and Anna even offers tips and tricks for stuffing these teeny little cutiepies and tying off your ends neatly.

The actual patterns are equally clear, and very simple once you’ve got the hang of battling nine stitches on DPNs. I started with an elephant (toot toot!) and hadn’t knit in the round for ages, so for a little while I felt a bit like a weird, low-budget version of Edward Scissorhands.

Did I deliberately paint my nails before I started knitting because I knew I'd take photos? Yep.

Did I deliberately paint my nails before I started knitting because I knew I’d take photos? Yep.

Patterns are mostly made up of simple increases and decreases and work with i-cords. All your new friend’s appendages are made by picking up and knitting stitches, so if you’ve got those skills down you’ll definitely be able to tackle any of the patterns in the book.

Altogether now: "Squeeeeee!"

It’s even cute without legs. Or ears. Or a face.

My favourite thing about these patterns (apart from their heart-wrenching cuteness, obviously) is that they really forced me to start being a bit of a perfectionist. Like my bio says, I’m a pretty slap-dash crafter, but with a project this small every mistake becomes glaringly obvious so it’s essential to pay super close attention to the instructions.

In fact, I even found myself approaching tying in my ends, and adding details, much more carefully; I even re-did the eyes (twice!) because I wasn’t sure they looked quite right. Because you’re working in such minute detail, the slightest difference in stitch placement can give these little guys an entirely different character.

Overall, I’d definitely recommend the book; it’s easy to follow, fun, and the results aren’t just irresistibly cute but achievable, too. It can be frustrating sometimes when you can’t get finished results to look like they do in their picture, but you won’t have that problem here.

I’ve now added a little dino to the family (he’s in the photo at the top!) and will be making a few more as a gift. Next, I’m dying to tackle Anna’s Squidpocalypse. It’s exactly as mad as it sounds.

mochimochi5

Small dino.

mochimochi4

Small tooter.

Small friends! :)

Small friends! 🙂

Mums are the best

Cushion pattern

Mums are the best. Well, my mum certainly is. She’s always there when I need her (no matter what), puts up with my variable moods, rants and moans, and has this uncanny knack of being able to read my mind.

Today, my mum sent me a parcel in the post. This has happened before. In times of self neglect I have received little hand creams, lip balms and self indulgent magazines – little pick me ups to get me back on track and into the positive swing of things. Today though, she’s really excelled herself. In my package (kindly delivered by the postman at 7.45am!) I found some green and blacks chocolate for James (because he’s been working so hard), a fiver from my dad (with the request that I buy some scratch cards – he wants to try his luck here in Exeter!), the Claypole newsletter (just so I know what we are not missing out on back home) and the most beautiful handmade cushion!

Cushion on seat

Now let me explain. As I’ve mentioned before, me and James have just bought our first home which means that, among other things, we are busy doing a whole lot of decorating! One particular room we have been focusing on is the living room. After plastering, sanding and painting it’s really starting to take shape and, as part of the overhaul, we decided to treat ourself to a brand new sofa! Now this might seem like a bit of a luxury and I guess it is (!) but it also seemed rather essential. The past couple of years we’ve been living with a second hand futon and although it works (i.e. you can sit and sleep on it) it’s getting to the point where you would rather not. Both of our parents have made a few comments now on it’s…inadequacy…so now we have a brand new sofa bed with memory foam mattress on it’s way (YAY!).

Cushion on seat2

Our idea with this sofa is that we will fill it with lots of interesting and colourful cushions and as soon as my mum heard about this, she decided she wanted to make me one. I didn’t ask her to do this, she just did it … and she did it really well. The cushion I received in the post this morning is beautiful. The colours are just perfect and I love the 1970s vibe it gives off. There’s something about knitted cushions that just make me want to snuggle up with some fruit tea and watch a film. This one does just that, but it’s so much better than those you can buy in the shops. It was knitted by my mum. Now I can’t wait to get our new sofa just so I can put my squishy new cushion on it!

Thanks mum, you are the best.

An overdue post about a Christmas jumper

This post is long, long overdue, but I was so proud of this project that I couldn’t let a busy Christmas and new year stop me from sharing it.

I’ve wanted to knit Alex something for a long while, and had originally promised to make him a Christmas jumper – you know, a proper tacky one with reindeer and stuff on it – but, I changed my mind.

He rocks knitwear, and I wanted to make him something special for Christmas that he could wear all year round.

lovely alex 3

I used Sirdar’s ‘Textured Jumper in Sirdar Click Chunky‘ with, for once, the recommended yarn. I usually mess about and pick different yarns of the right weight, but Sirdar Click Chunky is not only great value but beautifully soft – perfect if your lovely other half, like mine, can’t stand itchy clothing.

lovely alex 2

I couldn’t recommend this pattern enough. For its simplicity (it’s very repetitive, but I consider that a positive) and the quickness of the knit using chunky wool, it looks really effective. The cables are absolutely stunning and I was so happy with how they turned out.

lovely alex

If I could change anything, there is one spot where I messed up the rib pattern (see if you can tell where) and I’m not entirely happy with the fit on his shoulders.

Overall, while it did put me off knitting for a while (I as usual totally underestimated how long it’d take to weave in ends and sew it all together) I was so, so pleased with the end result. And, luckily, so was Alex!

A few ideas for Christmas knitting

PIRATES- Amanda Vines BLAZERS U6-Rick Barrett

I’ve been off work sick for the past few days. Seeing as looking at any screen for a prolonged period of time made my head want to explode, the bright side is that it gave me plenty of time to work on my newest knitting project (while wrapped in a blanket, drinking tea and occasionally weeping pathetically).

I can’t write about what I’m actually making in case the person I’m knitting for stumbles across this post – I’ll have to write about it after Christmas – but it got me thinking about Christmas knitting. So, here are some tips to help you get started with your crimbo crafting.

Get a bit weird and cutesy.

PIRATES- Amanda VinesBLAZERS U6-Rick Barrett

Christmas is a festival of all things adorable and wintry. Embrace it, friend. There are some great Christmas knitting boards on Pinterest and one of my favourites is by Let’s Get Crafty magazine,  which also links through to all the patterns. Don’t be afraid to knit some novelties – they make really cute gifts and can be whipped up really quickly!

Perfect patterns
Where to start? If you’ve been thinking wine bottles look a little chilly this time of year you’re not the only one. In fact, so are mugs! And how could I mention ‘cute’ without linking to one of my favourite designers, Anna Hrachovec? Her teeny creations are ideal stocking fillers; start with a whole herd of Tiny Reindeer (pictured top).

Think big. Big yarn, that is.

chunkyowls

By that I mean – go chunky. You only have one pair of hands and so many hours in a day, and the likelihood is you also have to squeeze in boring stuff like working, feeding yourself and sleeping (snore). So rather than planning in loads of crazy, fiddly 4ply, stick to patterns using chunky yarn.

Perfect pattern
Desperate to knit a cute Christmas jumper?  Try the gorgeous owls sweater pattern by Kate Davies Designs (see above). There’s even an adorable owlet pattern for little ‘uns. Aw.

Accessorise.
When I started thinking about Christmas knitting (in, like, August) I was convinced I was going to knit everyone I know a jumper. Everyone. All of them. A couple of months on I realise that’s totally crazy, and things like socks, scarves and hats are the way to go.

Perfect pattern
These chunky knitted slipper boot patterns are completely free, and would make a super snuggly present for someone with chilly toes.

Toys, toys, toys.

PIRATES- Amanda Vines BLAZERS U6-Rick Barrett

Toys aren’t just for kids. Well, I mean, they’re supposed to be – but some are just so cute even grown-ups can’t resist. Knitting up a few animals is a great way to use up leftover yarn, or to just indulge your obsession with knitted animals in funny outfits. Whatever, really.

Perfect patterns
I love pretty much everything by Barbara Prime, (non Ravelry-ers can view her adorable designs here) but especially her beautiful Pug with Anorak. Totally irresistible. I also recently stumbled across the pretty natty Sophisticated Mr Fox by Amanda B Collins.

Anyway, they’re just a few places to start. What are you knitting for Christmas? Let us know 🙂

Kaffe 2014 – The Colourful World of Kaffe Fassett

Last week I headed down to Bath with my lovely bearded boyfriend, Alex. Well actually, we first went to visit Kate and James in Exeter; I’d wanted to buy pom pom makers and force the guys to learn how to use them, but that got vetoed and we went out drinking instead.

I also failed to eat a rack of 12 BBQ pork ribs. The shame.

Anyway, I could go into detail about the whole trip (which was lovely) and throw in an account of our stop-off in Cheddar Gorge (I almost died) but what I really want to write about is an exhibition we stumbled upon while visiting the American Museum in Britain: Kaffe 2014.

IMG_0258

First thing to admit: I’d never heard of Kaffe Fassett. I know, I know, sorry everyone – but I learnt to knit when I was a kid when all I wanted to make were soft toys (and only picked up my needles to make clothes last year), so I’ve hardly had any reason to get clued up on the knitwear design scene.

That said, this one exhibition was all the reason I needed to get started. Turns out that Kaffe was a colour genius, and an engineer of both colour contrasts and clashes. This visit was the first time I’d ever wanted to wear a whole room of knitwear and demand the world viewed me in my garish glory.

IMG_0250

The patterns, textures and garments were all absolutely stunning and in the most part glaringly, and irresistibly, 80s. I felt as though I couldn’t open my eyes wide enough to drink in all of the colours, an idea encapsulated perfectly in some of my favourite of Kaffe’s words from a wall of his best known quotes: “My motto is always, ‘When in doubt, add twenty more colours!'”

IMG_0227

IMG_0239

The importance of colour to Kaffe infiltrated the entire exhibition, which was arranged by colour; there were sections in bright yellow, vibrant pink and my favourite: cool, calming blue.

IMG_0233

But while Kaffe’s knitwear was eye-popping, his needlework was unbelievable. He cited needlework and knitting as new avenues for his previously traditional art, and his painterly background totally comes across in the work. I could not get over these slippers.

IMG_0237

IMG_0245

I think my favourite part of the exhibition, aside from the bright pink, was the concept of knitting as an art form as opposed to a way of making clothes or even simply as a craft. Kaffe speaks of it as a replacement for paint and other materials, in the same way he talks of his needle and thread, and I found that to be a huge inspiration.

IMG_0242

If you’re in the south west area or planning a city break in Bath, I couldn’t recommend this exhibition more; it’s only small, but if you’re already in the area it’s certainly worth a visit. I’ll leave you with my absolute favourite part of the exhibition, which is totally stunning. Kaffe, I only wish I’d heard of you sooner.

IMG_0229